Learning how to read sheet music doesn’t have to be hard! If you’re reading this article, sheet music probably looks like a foreign language to you. You may find it difficult to understand how those crazy symbols can turn into beautiful music.
If that’s you, don’t worry — you’re not alone!
Every good musician felt the same way in the beginning. Heck, even I still look at some pieces and think, “wow, that’s impossible.” And I’ve been playing music for 12+ years!
I’m here to tell you that it’s not only doable to learn how to read sheet music, but it’s probably not as hard as you think.
First of all, let’s define sheet music:
Sheet music is simply a ‘how-to guide’ for performing a piece of music.
Just like the words on this page are symbols to indicate my thoughts, sheet music indicates a musician’s musical thoughts.
With that said, are you ready to hear something liberating?
The only things sheet music tells you are:
- What notes to play
- How long to play those notes
No matter how complex the song, those are the only things sheet music tells you — nothing more, nothing less. I hope that’s encouraging for you as it was for me when I first started because that realization made learning how to read sheet music not as daunting.
Anyway, this article is a 4-step guide that will teach you the fundamentals of reading sheet music. After reading this article, you’ll immediately be able to read and understand sheet music of your favorite songs and artists.
Before we begin, let’s look at a few reasons why you should learn how to read sheet music.
5 Benefits of Learning How To Read Sheet Music
- Learn to play your favorite songs. This obvious benefit is probably the reason you’re here. Imagine being able to read a piece of paper and all of the sudden you’re playing your favorite songs!
- You become a better musician. Being able to read sheet music gives you the ability to learn more songs and genres quicker. And the more songs/genres you learn, the better you become. Naturally, you’ll start with reading easy pieces and gradually increase the difficulty. Being able to understand sheet music will also help you communicate better with other musicians. You’ll be able to explain your musical thought process and write it out in a universal way.
- You’ll be able to play any song, any time, with anyone. For example, a piano player can walk into any band rehearsal or live gig and join the song if he’s given the sheet music.
- You won’t need to memorize everything. This is important if you want to play live gigs. You don’t need to memorize your entire 50 song set. All you need is your sheet music. This will free up space in your mind that you can use for creativity!
- You’ll build physical and transferrable skills. Being able to read sheet music will increase your attention span, fine motor skills, multi-tasking ability and reading comprehension. These benefits will spill over into many areas of your life.
Now that you’re excited to learn how to read sheet music, let’s look at the 4-step process to show you the way!
Step 1: The Staff
The lines that the notes are placed on is called the staff. Think of the staff as the lines on notebook paper. This is where ‘musical sentences’ are written.
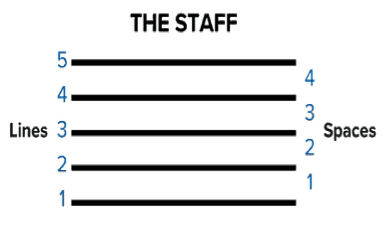
As you can see, there are five lines and four spaces. Each line and space assigns each note its musical value — C, F#, D, etc.
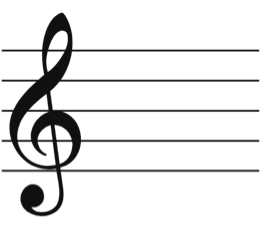
Step 2: Clefs and Note Values
Before we learn the notes on the staff, it’s important to understand the cool looking symbols at the beginning of each staff. You may have seen the treble clef:
You also may have heard of the bass clef:
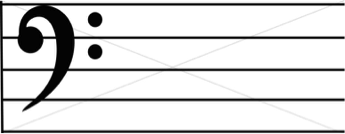
These clefs tell you where to play the notes on your instrument.
Simply put, the treble clef tells the musician to play the ‘higher’ notes. The bass clef, just like it sounds, tells the musician to play the bass/’lower’ notes.
Using the piano as an example, the treble clef tells you what your right hand plays. The bass clef tells you what your left hand plays.
Here are the notes that correspond with each clef’s staff:
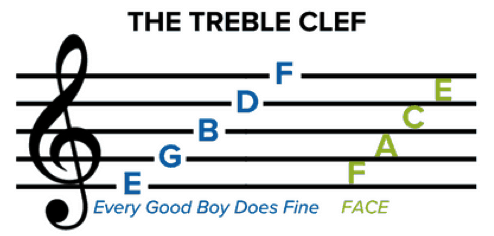
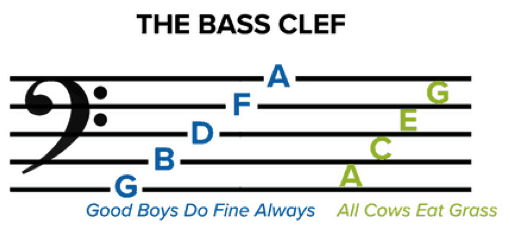
As you can see, each line and space has a designated note value. The treble clef’s notes are a little different from the bass clef’s. Also, each clef has cute little acronyms to help you memorize the notes. I personally use ‘FACE’ and ‘ACE-G’ to remember the spaces for each clef.
Once you memorize FACE and ACE-G for the spaces, it’s easy to figure out the notes on the lines. Realize that each step going from a space to a line (also called an interval) is simply going chronologically to the next letter in the alphabet. So you can identify any note that falls on a line by simply counting up one letter from the space beneath it.
Ex: in the treble clef staff, if the note is on the middle (third) line, what note is it? It’s a B note. If we use FACE, we can move up the next letter from the second space (A) to end up at B.
Does that all make sense?
If not, go back and review it before continuing. If so, you’re almost done!
Moving on.
You’ll realize that some notes can fall below OR above the staff:
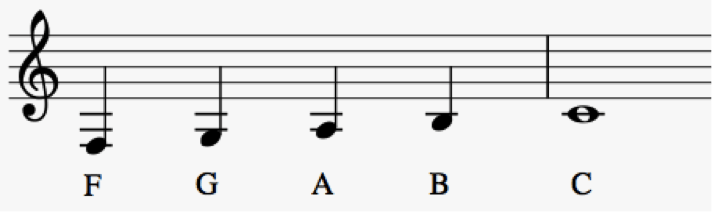
These notes are on what’s called a ledger line — basically a staff that’s outside of the staff.
The easiest way to identify these notes is to memorize the C note in the example above. Another name for this note is middle C because it’s the note in the center of the piano. If you can remember that note, then you can easily identify its surrounding notes. How? By simply using the same ‘chronological counting’ technique used with FACE and ACE-G.
Let’s look at “Twinkle Twinkle Little Star”:

Using what you’ve just learned, you can now identify all of the notes in this song. Try it! I’ll reveal the answers at the end of the article.
It goes without saying, this is a VERY big piece of the musical puzzle.
Remember what I mentioned in the beginning of the article?
“The only things that sheet music tells you are:
- What notes to play
- How long to play those notes”
After step 3, you’ll officially know the ‘what notes to play’ portion.
Before moving on, I think it’s important to mention what a chord looks like:
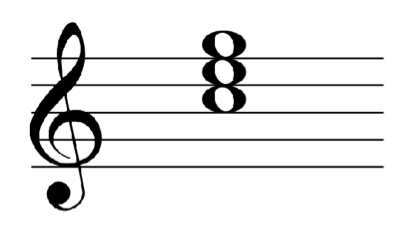
I promised we wouldn’t dive deep into complex music theory. So for now, just know that a chord is simply individual notes stacked on top of each other. This indicates that all of the notes should be played at the same time. If you want to learn exactly what chord this is and how chords are formed, use this as a resource for further learning.
Step 3: The Key Signature
The key signature tells you what key the song is in. In other words, it tells you which notes should be sharp (# symbol) or flat (♭symbol) in a song.
To make a note sharp means moving it up a half-step on your instrument, while making it flat means moving it down a half-step. On a piano, this means you go from the white key to the nearest black key instead of going from one white key to the next white key.
Here’s what a key signature could look like:
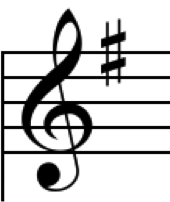
Here’s a quick quiz: what note is the # symbol is on? If you said F, you’re a future Beethoven. If not, shake it off…
Remember the acronym FACE for the treble clef? The E is the top space, and we want to find out the note on the line right above it. So what’s the next letter up from E in the alphabet? The answer is F, of course.
What does this F# in the key signature tell us? It tells us that every F note in this song turns into an F# — that’s all.
Lastly, you may find sharp, flat or natural symbols in front of individual notes like this:

These symbols are called accidentals. They simply sharpen or flatten individual notes instead of ALL of the notes in a given song. The natural accidental means to bring the note back to its original value despite having directions from the key signature to sharpen or flatten it. Using the example above, if there was a (#) on the F note in the key signature, the natural accidental would tell the musician to play a regular F instead of an F# for that particular note.
If you understand steps 2 and 3, you now officially know how to identify all of the note values in a piece of sheet music. Let that sink in.
Let’s recap: we know what the staff is, what notes correspond to each line/space based on the type of clef and how key signatures and accidentals can alter certain notes of a song.
Now, let’s finish up by figuring out the rhythm for these notes.
FINAL Step 4: Time Signatures, Measures and Note Duration (Oh My!)
In this section, we’ll use “Jingle Bells” guide us:

We haven’t touched on what 4/4 means and why some notes look different than others.
In short, the time signature is the 4/4 symbol, the measures are the four sections that the notes are in and the bar lines are the vertical lines that separate the measures. Measures can also be called ‘bars’ for you alcoholics.
Those are the definitions, but how do we apply them?
The time signature tells you how many beats are in each measure. This is important to understand.
4/4 (pronounced “four four”) is the most common time signature — it’s also called “common time”. It means there’s four beats per measure. Another common time signature is 3/4 which has three beats per measure. This time signature is common for waltzes
As you can see in “Jingle Bells”, the first measure has three notes, the second measure has three notes, the third measure has four notes and the last measure has one note. You may be wondering, “but how can that be? He just said each measure gets four beats.” Or, “why are some notes filled in, while some notes are hollow?”
You see, not only does each note have a musical value (F#, B, A, etc.), but also a rhythmic value. In other words, the notes also explain the duration to play that note for. See the chart below:

In a 4/4 time signature, the notes in a measure must always add up to four total beats.
From this we can conclude that a whole-note has a rhythmic value of four beats, and therefore takes up one entire measure in a 4/4 time signature…
A half-note is held for two beats, so you can play two half-notes per measure. And a quarter-note equals one beat. So how many quarter-notes can you play per measure in 4/4 time?
That’s right, four.
You cannot, for example, have five quarter-notes, three half-notes, 2 whole notes, etc. in the same measure.
You now understand why “Jingle Bells” can have three notes in the first two measures — these notes add up to four total beats.
If you haven’t already, try humming the tune while reading it, and you’ll understand how it all ties together.
Conclusion
Well, there you have it. You can now look at a staff and know what the note values are and how long to hold them.
Is there more to learn? Absolutely. But you now understand the fundamentals. And everything is based on the fundamentals.
Let’s conclude by dissecting “Twinkle Twinkle Little Star”:
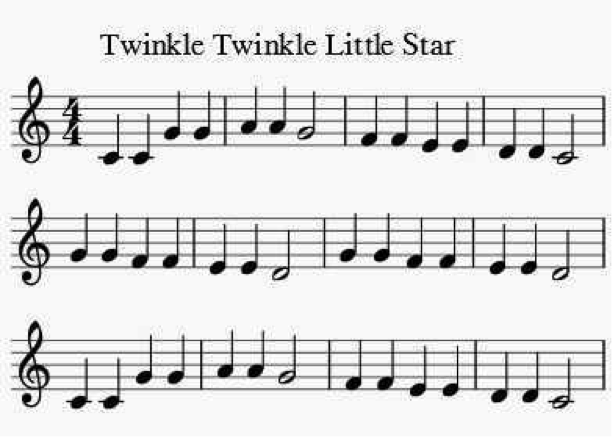
We can find out a lot of information about the song from what’s on the left side of the staff. We see that there is:
- A Treble Clef — this shows where to play the notes on your instrument
- A 4/4 Time Signature — this shows that there’s four beats per measure (“1, 2, 3, 4” | “1, 2, 3, 4”) so we can use four quarter-notes, two half-notes, one whole note, etc. per measure
- A key signature with no sharps (#) or flats (♭). There’s also zero accidentals on individual notes.
- Two C quarter-notes and two G quarter-notes in the first measure
- Two A quarter-notes and one G half-note in the second measure and so on…
All the information above tells us which notes to play and how long to play them.
Boom. Just like that, you can now read sheet music. Congratulations!
However, the real challenge is being able to play what you read J
Final Tips:
- A big piece of music can be intimidating. Take it one measure at a time.
- This is only a starting point. There are endless resources on Google and YouTube to further your knowledge on music theory.
- Apply this knowledge by searching for ‘easy sheet music’ on Google and dissecting the pieces
- Be consistent — 15 minutes of music training every day is much better than two hours once per week. Music is a life-long journey!
Thank you for reading this far, and good luck on the rest of your journey!

